Sign in
ADA and Accessibility Considerations for Hoshizaki Dispensers
February 17, 2026
46
Making ice reachable for everyone isn't merely a matter of layout - it's often essential in business settings. Meeting ADA needs with Hoshizaki units means looking past simple positioning, instead prioritizing ease and safety for those who move differently.
This works with a Hoshizaki flaker, an F-series model, or just a basic cube machine. Thinking ahead about access makes life easier for restaurants, hospitals, pubs, shops - keeps them clear of legal hiccups, stalled checks, expensive fixes.
Requirements
ADA reach-range and height guidelines
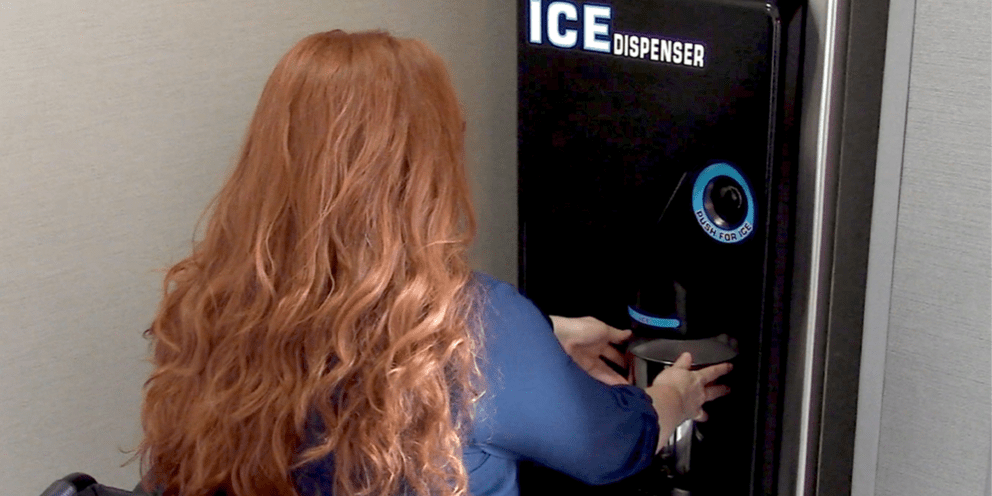
Operating interfaces like taps, switches, and handles need to sit within ADA access guidelines. Usually, these elements work best when placed from a foot up to four feet above ground level. Reaching them shouldn't require awkward leans or overreaching motions. Accessibility improves when users can interact comfortably, straight ahead or slightly forward.
Knee plus foot space
Some Hoshizaki units need an unobstructed area under the front so wheelchairs can fit. Clearance dimensions - width, depth, height - are checked by installers using both ADA rules and the unit's design specs.
Safe approach and maneuvering room
A layout that meets ADA standards needs enough room for direct access, along with smooth turns. Particularly crucial in compact kitchens, or where seafood cases pile high with flake ice made by a Hoshizaki unit.
Stable and slip-resistant flooring
Wet floors often appear around ice machines. Because people walk through these areas constantly, traction underfoot matters - surfaces need grip to keep steps steady.
Fulfilling regional regulations
ADA rules come from the feds, yet cities sometimes add their own layers. Crews on the ground follow federal baselines along with regional sanitation policies. If you need advice tailored to your location, reach out via the support section online.
Steps: Evaluate the installation location
Installers check how a space is set up, how people move through it, and where pathways lead. When it comes to ice machines meant for big crowds, getting to them from multiple sides might be necessary.
Check if the counter aligns with the stand’s elevation
Some dispensers sit atop countertops, others attach to ice displays or storage units. Depending on accessibility rules, they might need shorter supports or redesigned shapes to meet height standards.
Arrange the knobs and handles where they belong
Operating dispensers - whether levers, paddles, or motion-sensor types - calls for minimal hand strength, avoiding stiff twists or tight grips. Accessibility here isn’t just about compliance; it eases flow during busy moments behind counters.
Make sure the area is free of clutter
A clear path for wheelchairs means leaving enough room to move. Moving things like shelves or cabinets nearby can help free up that space. Position shifts by installers allow better access without blocking movement.
Check how far the dispenser extends, then observe its motion during use
Technicians check the dispenser while sitting, then repeat from a standing position before giving approval. Comfort at the ice outlet gets verified this way - especially for models serving up flaked ice near fish cases or niche setups.
Measurements, spacing, and assembly notes get documented - helping with checks later on or when updates come up. If adjustments pop up, team members turn to the Installation section for direction.
Common Pitfalls: Installing equipment too high
A slight rise in countertop elevation might exceed ADA access standards, forcing a move or swap-out. Height adjustments, though minor, could mean reinstalling units elsewhere. When surfaces grow taller, dispensers may land beyond approved ranges. A tiny lift here often leads to gear changes there.
Focusing solely on the dispenser's size tends to overlook usable space around it, leaving little room to move - this can result in inspection issues even when the hardware fits just right.
Facing blocked pathways Shelves nearby, bins cluttering space, or checkout units in the way often restrict movement. Small barriers regularly transform acceptable setups into code issues.
Mismatched setup between the unit that serves and the one that freezes water into cubes
Some units need particular stands to sit at the right level, particularly flakers such as the F series model. Using mismatched supports might lead to trouble reaching parts or create operational hiccups.
Faulty layouts when setting up service lines
Misplaced wiring or pipes might push units out of code. Planning ahead sidesteps such hiccups. Help lives on the service site.
Test controls one last time. Check how high they sit. See if they feel right when used
All controls undergo inspection to meet ADA height requirements, functioning effortlessly under light pressure.
Check how much room there is, make sure things stay steady
Technicians check front access plus angles from the side, making sure the unit holds steady when operated.
Make sure team members get proper training - they need to know simple accessibility rules, like leaving walkways open and watching for hazards. Help stays on hand through the contact section if questions pop up later.
Plan your install with our team — see the installation page or contact us at our contact page.
ADA and Accessibility Considerations for Hoshizaki Dispensers
Intro
Making ice accessible to all users is not just a design choice—it’s a requirement in many commercial environments. When planning an installation that meets ADA and accessibility considerations for Hoshizaki dispensers, operators must think beyond basic equipment placement. The goal is to ensure that everyone, including users with mobility limitations, can safely and comfortably access the ice. This applies whether the dispenser is paired with a Hoshizaki flaker, an F series flaker, or a standard cube-making unit. Understanding these requirements early helps foodservice operators, bars, healthcare facilities, and retail locations avoid installation delays and compliance issues.
Requirements
ADA reach-range and height guidelines
Installers must ensure that the dispensing point, buttons, and cup levers are within ADA-compliant height limits. Typically, controls should fall between 15 and 48 inches from the floor and must be reachable without stretching or leaning.
Knee and toe clearance
Some Hoshizaki dispensers require space beneath the front side so wheelchair users can position themselves properly. Installers confirm clearance width, depth, and height based on ADA guidelines and the specific dispenser model.
Safe approach and maneuvering room
ADA-compliant layouts need adequate floor space for turning and straight-line approaches. This is especially important in tight kitchens or seafood display setups using flaked ice from a Hoshizaki flaker.
Stable and slip-resistant flooring
Because ice dispensers naturally lead to moisture around the area, the flooring must support safe movement for all users. Slip-resistant surfaces are recommended for busy operations.
Compliance with local codes
While ADA rules are federal, local jurisdictions often add requirements. Installers refer to both the national standards and local health department regulations to avoid violations. If unsure, operators can consult our service page for site-specific guidance.
Steps
1. Evaluate the installation location
Before placing the dispenser, the installer assesses the room layout. For commercial ice equipment serving large groups, accessibility from multiple sides may be needed. The key is ensuring the primary access point meets ADA rules.
2. Verify counter or stand height
Many dispensers are mounted to counters, ice stands, or bins. For compliance, the working height must align with ADA reach requirements. Adjustments may include lowering the stand or selecting a dispenser with a shorter profile.
3. Position controls and levers properly
Push levers, touch-free sensors, or dispensing paddles must be easy to access. Controls should not require tight grasping, pinching, or twisting, benefiting not only those with disabilities but also general users in fast-paced settings.
4. Confirm clear floor space
A wheelchair-accessible approach requires a defined amount of open space. Installers often reconfigure nearby commercial ice equipment—such as storage bins or backbar units—to create sufficient maneuvering room.
5. Test for proper dispenser reach and operation
Before finalizing the installation, the technician tests the dispenser from a seated and standing position. This ensures users can comfortably reach the ice outlet, especially with machines delivering flaked ice for seafood display ice or other specialty uses.
6. Document compliance conditions
Installers record measurements, clearances, and setup notes. This documentation helps operators prove compliance during inspections and can assist future service teams when upgrading or modifying equipment. If modifications are required, resources like our installation page can help.
Common Pitfalls
Installing equipment too high
This is one of the most common mistakes. Even a few inches of added counter height can push the dispenser out of ADA range. Shorter stands or alternative models may be required.
Ignoring floor-space requirements
Operators often focus on equipment footprint but forget the surrounding clearance. Without enough maneuvering room, the installation may technically function but still fail ADA inspection.
Overlooking obstructions
Nearby shelves, trash bins, or POS systems may block access. These minor obstructions can turn an otherwise compliant installation into a violation.
Incorrect pairing of dispenser and ice machine
Some machines, especially flakers like the F series flaker, require specific stands or dispensers to maintain proper height. Using the wrong combination can create accessibility issues and mechanical problems.
Poor planning for electrical and water line routing
If utilities are run in the wrong direction, the dispenser may need to be placed too high or too far back. This is why early design coordination is essential. Teams can avoid this issue by planning with guidance from our service page.
Final Checks
Verify control height and usability
Installers confirm that all controls are within the proper ADA height range and that they function smoothly with minimal force.
Confirm approach space and stability
Before signing off, technicians test both forward and side approaches to ensure users can reach the ice outlet easily. They also check that the dispenser and surrounding equipment remain stable during operation.
Review operator training
Staff should understand basic accessibility considerations, including clearing obstructions and maintaining safe conditions around the dispenser. For ongoing service, operators can connect through our contact page.
Plan your install with our team — see our Installation page or contact us for support.
Featured Product


Recent Posts


Login and Registration Form